May 2017 Castle BRI Newsletter

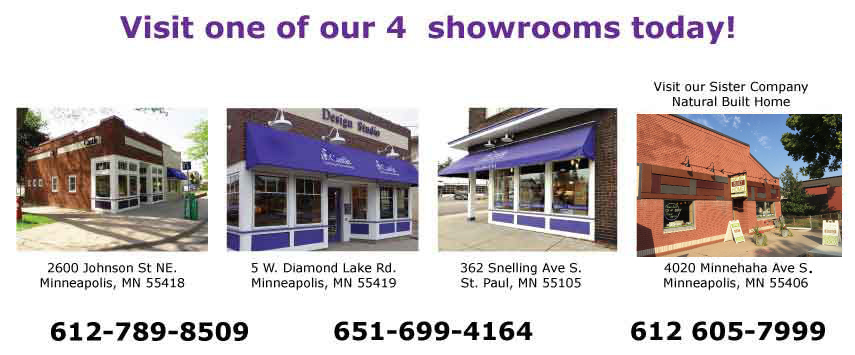
Schedule an Appointment / Get an Estimate                       612-789-8509                651-699-4164


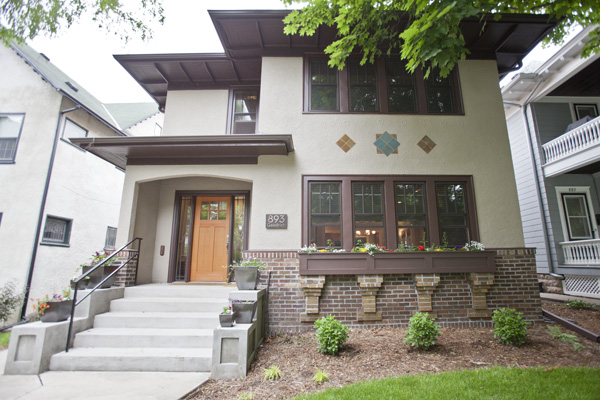
Featured Project: Exterior Bungalow Remodel


Mark Benzell is our go-to designer when it comes to additions and exterior remodels. We asked him to give a few tips when it comes to updating the exterior of a home:


“Enhancing front entries, or front elevations of homes,” explains Mark, “has become very common, especially for post WWII homes that tend to be a little more basic in exterior design, and not tied to a traditional architectural style (like Tudor or Craftsmen). Also trending, is updating older siding materials to lower maintenance products, like cement fiber board and steel.”


Amy Hinck, Design Manager, adds, “Ideally you would start planning an exterior remodel about 4 months prior to a desired construction start date. And be mindful that the prime time of exterior construction is April-October. Some work can be done in winter, but you’ll just need to wait for finish touches like painting/concrete/stucco to be done when the weather cooperates.”


Mark continues that exterior remodels are a bit different than the traditional interior remodel, “For any exterior remodeling project, we always want to inspect a home for possible water intrusion, ice damming, and material deterioration.  The effects of rain, hail, snow and wind over time can have an damaging impact on any home.  Using heavier weight shingles, water resistant sidings materials and water tight window and door installations goes a long way to ensuring a low-maintenance home exterior.”


Exterior Bungalow Remodel


In this featured project, custom details added on the exterior include new concrete steps and walk, flower boxes, and new bracketed overhang at the rear entrance. Field Landscaping was a key partner in this project, and were able to advise on plants that could do well in our Minnesota climate.
Depending on the home, a small entry expansion or addition can have a huge impact on a home’s curb appeal.  Even a new front door can make a difference.The exterior of your home is not only a first impression to visitors, but can also be utilized as “livable” space, if done right!


Product Spotlight:  Therma-Tru Entry Doors

One easy way to transform your curb appeal is a new front door. Designer, Mark Benzell, recommends the brand Therma-Tru. Mark adds, “In most cases, we try to make any exterior remodel, either look like it fits with the current style of the house, or that it belongs with the style of the neighborhood.” So while you want to show your own personal style, keep in mind that a new front door should complement your architectural style, for optimal results.

With a front door by Therma-Tru, not only will you see an increase in comfort, energy efficiency and performance, you will also see an increase in curb appeal. In fact, you can increase the perceived value of your home just by adding a Therma-Tru entry door system.


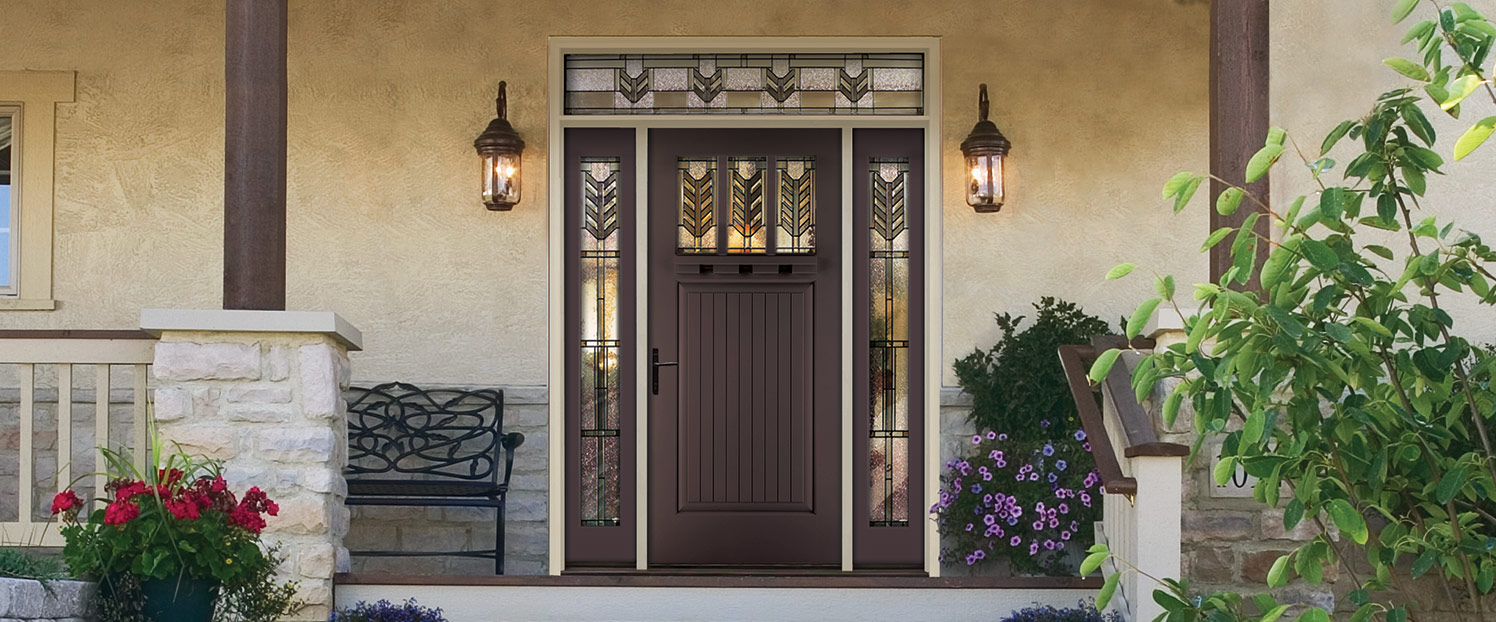
To learn more about this company and eligibility for federal tax credits with your Therma-Tru products, click here.


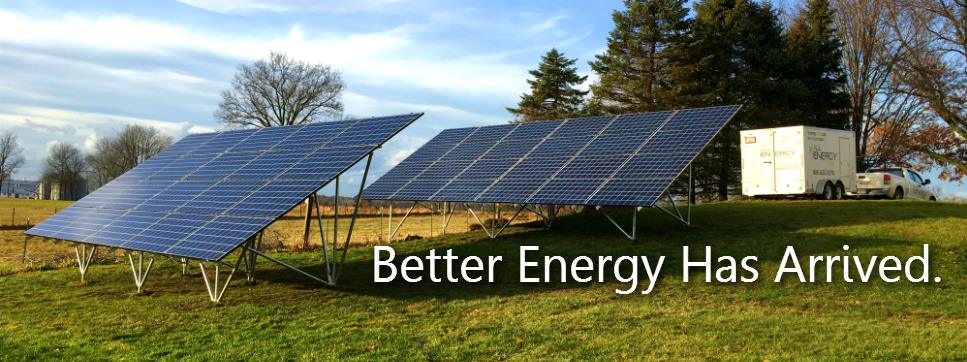
Educational Class Spotlight: Evaluating Solar for Your Home

Is solar energy ideal for my home? How much does it really cost? How does solar energy even work?

All Energy Solar will be able to answer all of your questions and more during this class on Saturday, May 20th at 10am at The Natural Built Home Store. There is no cost to attend. Please register here.

Solar Energy


Reminders & Information

FREE Educational Remodeling Classes
All classes are FREE to attend! Classes are held Tuesday evenings from 6:00 p.m. – 7:30 p.m. and a few Saturday mornings from 10:00 a.m. – 11:30 a.m. All classes are instructed by a knowledgeable Castle employee or one of our trusted Trade Partners. Class space is limited, please sign up online to guarantee your spot. For a full 2017 class list, please visit our website!

The Natural Built Home Store
May 20th, 2017 – All Energy Solar: Evaluating Solar for Your Home

St. Paul Showroom
May 9th, 2017 – Planning a Bath Remodel

Northeast Minneapolis Showroom
May 23rd, 2017 – Planning a Basement Remodel


Did you have a great experience with Castle?
We’d love to hear about your experience with Castle, how you’re enjoying your new space, and any general thoughts or comments you’d like to share. Tell us your thoughts today!


Fading, Yellowing, Peeling, Cracking, Sagging, Wrinkling Paint Problem – What to do?

Problems with Paint

There are various problems that can occur with painted surfaces. Fading, yellowing, peeling, cracking, sagging and wrinkling are the most common issues and all can be easily fixed.

Fading1

Fading is described as premature and/or excessive lightening of the paint color, which can occur on surfaces with sunny exposures. This is relatively easy to see because hidden areas such as eaves will not usually fade. Fading/poor color retention can also be a result of chalking of the coating (e.g. primer, paint or stain).


Possible Cause

• Colors will fade slightly when exposed to intense sunlight. As the coating ages, the fading can become more noticeable. Slight fading is acceptable, provided it is gradual and uniform so as not to be noticeable. Excessive chalking of the paint film will cause colors to appear lighter.

• Interior-grade colorants used outside will fade.

• Adding more tint to the coating than is recommended.

• Interior coatings may also fade if they are near windows and there is significant sunlight exposure.


Solution

If the substrate is in good condition except for fading, clean as needed and repaint using a paint that is fade-resistant. Follow label and data page directions for surface preparation for the coating.


Yellowing2

Yellowing is defined as the development of a yellow cast in aging paint, most noticeable in the dried films of white paints or clear varnishes.


Possible Cause

• Alkyd/oil based paints, because of their curing mechanism; tend to yellow, particularly in areas that are not exposed to sunlight.

• Oil-based varnishes start with an amber cast and will darken with age.

• Heat from stoves, radiators, and heating ducts.

• Lack of light, for example, behind pictures or appliances and inside closets.

• Tobacco staining or other environmental contaminants.

• Moisture.


Solution

If there are no other problems and the yellowing is not offensive, repainting is not necessary. Repainting using a latex paint will reduce the amount of yellowing, but if the environmental conditions that caused the previous coating to yellow continue, any new coating will likely yellow as well.


You might be interested in this article on how to fix white paint that has gone yellow.


Peeling3

Peeling is the loss of adhesion of a coating to the substrate (e.g. the surface that was painted) or an earlier coating. Where there is a primer and topcoat or multiple coats of paint, peeling may involve some or all of the coats.


Possible Cause

• Seepage of moisture through uncaulked joints or worn caulk.

• Leaks in roof or walls, or excess moisture escaping through the walls from the interior.

• Painting over a dirty, wet, or glossy surface.

• Painting over a coating that already has marginal adhesion.


Solution

Remove old, loose, cracked caulk; prime as needed; and caulk with the appropriate product

Find and repair any source of water.

Follow label and data page directions for proper surface preparation methods for the coating.

Test the coating in a 6″ to 12″ radius around any peeled areas to be sure its adhesion is adequate.


Here is a nice step-by-step guide (with pictures) on how to fix peeling paint. Check it out here.


Cracking4

Cracking is the splitting of a dry paint film through at least one coat. In its early stages, the problem appears as hairline cracks; in its later stages, flaking occurs.


Possible Cause

• Use of a paint that has lower adhesion and flexibility properties.

• Over-thinning or over-spreading the paint.

• Inadequate surface preparation, or applying the paint to bare wood without first applying a primer.

• Excessive hardening and embrittlement of paint as it ages, the coating loses the ability to expand and contract with temperature and humidity changes.


Solution

Remove loose and flaking paint with a scraper or wire brush, sanding the surface and feathering the edges.

If the flaking occurs in multiple layers of paint, use of a spackling compound may be necessary to make a uniform surface. Test the coating surrounding any peeled areas out about 6″ to 12″ to be sure the adhesion is adequate.

Prime bare wood or plaster before repainting.

Apply the coatings at the recommended spreading rate (e.g. the recommended total area that can be painted) and using the recommended thinning rate (e.g. the recommended percentage that a coating may be diluted).


Check out this video on how to fix cracked walls.


Sagging5

Sagging is downward “drooping” of the paint film immediately after application, resulting in an uneven coating.


Possible Cause

• Application of too heavy a coat of paint.

• Application in excessively humid and/or cool conditions.

• Application of over thinned paint.

• Painting over a glossy surface, which does not provide enough of a profile to which the coating to adhere to.

• Painting over a surface contaminant.


Solution

If paint is still wet, immediately brush out or re-roll to redistribute the excess evenly. If the paint has dried, sand and reapply a new coat of paint.

Do not thin the paint unless recommended on the label or data page.

Follow label and data page directions for the appropriate environmental conditions for the coating.

Sand glossy surfaces dull to provide a profile for the coating to adhere to.

Follow label and data page directions for the appropriate spreading rate (e.g., the recommended total area that can be painted) for the product. Two coats of paint at the recommended spread rate are better than one heavy coat.


Wrinkling6

Wrinkling is a rough, crinkled paint surface, which occurs when uncured paint forms a “skin.”


Possible Cause

• Paint applied too heavily.

• Painting under extremely hot conditions or cool damp conditions, which causes the paint film to dry faster on top than on the bottom.

• Exposure of uncured paint to rain, dew, fog, or high humidity levels.

• Applying topcoat of paint to insufficiently cured primer or first coat of paint.

• Painting over contaminated surface (e.g., dirt or wax).


Solution

Scrape or sand to remove the wrinkled coating; sand the surface smooth to blend it in to the surrounding coating. Make sure the surface is thoroughly clean. If needed, prime bare areas with the appropriate primer, allowing it to dry completely. Reapply the coating following the label and data page instructions for spreading rate and environmental conditions.


Don’t know what paint finish to use after picking the color? Check out our article on how to choose your paint finish here.


Sources:

  1. https://www.sherwin-williams.com/homeowners/ask-sherwin-williams/problem-solver/dirt-stain-discoloration/fading
  2. https://www.sherwin-williams.com/home-builders/products/resources/sw-article-pro-yellowing
  3. https://www.sherwin-williams.com/homeowners/ask-sherwin-williams/problem-solver/peeling-cracking/SW-ARTICLE-DIR-EXTPEELDUEMOIST
  4. https://www.sherwin-williams.com/homeowners/ask-sherwin-williams/problem-solver/peeling-cracking/SW-ARTICLE-DIR-CRACKING
  5. https://www.sherwin-williams.com/homeowners/ask-sherwin-williams/problem-solver/sagging-wrinkling/SW-ARTICLE-DIR-SAGGING
  6. https://www.sherwin-williams.com/homeowners/ask-sherwin-williams/problem-solver/sagging-wrinkling/SW-ARTICLE-DIR-WRINKLING


How to Choose Paint Finish

Note: Some imperfections in wall and paint surfaces can be expected. Per Castle Building & Remodeling, Inc. contract the Residential Construction Performance Guidelines as published by the National Association of Home Builders will be used to determine acceptable workmanship. The guidelines state “A nail pop, blister, or other blemish that are readily visible from a distance of 6 feet under normal lighting conditions are considered excessive.


Choosing Your Paint Finish

Even after a homeowner has chosen the perfect color for a room, there’s another very important decision to make. With 5 or 6 paint finishes to choose from, you should learn the benefits of each and determine the right one for your job. Should you use flat or satin and why? Browse these tips on selecting the perfect paint finishes for your interior home applications.


Matte Finish

Whether called flat finish or wall paint, this type of interior paint has a matte surface. This paint finish is usually used on interior walls. It’s especially good if you have to camouflage small wall bumps, cracks, or other imperfections, as this finish does not reflect light. While some flat paints are advertised as washable today, you may need to touch up scratches or marks by covering with a bit more paint, so be sure you keep some on hand after you’ve finished painting.


Flat Enamel

Flat enamel is a paint with a durable flat, matte finish. It’s a good choice for powder rooms and halls, as it holds up to occasional cleaning.


Eggshell Finish

If you can picture the very low sheen of the shell of an egg, you have an idea of how an eggshell paint finish will appear. With only a slight hint of shine or gloss, it’s good for walls and holds up better with cleaning than a flat finish paint.


Satin Finish

Satin finish paint has a smooth, velvety look with a bit more gloss. It is most often used for windows, doors, trim, or ceilings, but can also be used as wall paint. This is particularly suitable for kids’ room walls, kitchens, or bathrooms, or in areas which get a lot of traffic. Paint with a satin finish is formulated to hold up to cleaning and light scrubbing.


Semi-Gloss

Semi-gloss paint is most often used on doors, trim, and cabinets in kitchens and bathrooms. It is easily cleaned and lays down a nice, subtle shine, without being too glitzy. Take care with pre-paint preparation work, as poorly prepared surfaces can be a bit distracting when highlighted by a semi-gloss surface.


Gloss

High gloss paints have an almost reflective quality, as their shiny finish mimics the look of enamel or plastic. Tough not widely used in home interiors, it is becoming more popular for a dramatic look on cabinets, trim, and furniture in very formal and very contemporary settings. This finish will magnify any surface imperfections, so careful preparation and sanding is essential before painting with high gloss paints.


Check out Protect Painters website here to compare the pros & cons of different paint finishes.


*Additional resources: Check out this neat website with photos for end products of each type of paint finishes.


Cleanability and Durability

While most manufacturers have developed all paint finishes with good cleaning qualities, a general rule is that the shinier the paint finish, the better it will stand up to washing and cleaning.


While most manufacturers have developed all paint finishes with good cleaning qualities, a general rule is that the shinier the paint finish, the better it will stand up to washing and cleaning.


Kid-Friendly Finishes

When painting children’s rooms, many painters recommend using an eggshell or satin paint on the walls and semi-gloss for doors and moldings. These finishes are formulated to better withstand repeated cleanings.


Rustic Looks

In order to give a worn or old look, use flat finish paints for walls or furniture. If cleanability is an issue, you might select a flat enamel for trim or an eggshell finish for walls.


High Gloss Looks

Rather than choosing a high gloss paint for a whole room, use it sparingly in select locations, such as doors and trim. The brilliant surface can appear a bit cold and uninviting. Remember to spend extra time preparing the surfaces to be painted glossy, as this finish tends to really point out any surface imperfections.


Ceiling Paint

If you’re looking for a basic white ceiling, you can buy pre-mixed, matte finish paints off the shelf at almost any paint or home improvement store. Because cleanabiltiy or coverage is not a particularly important consideration, some ceiling paints use cheaper formulations. If you need an exact color match for the color scheme of your room, choose regular tinted flat wall paint.


Ceiling Finishes

Ceilings in most rooms are painted with a flat finish paint. You could also select an eggshell finish if the surface of the ceiling is flawless. Choose a glossier finish for good light reflection, but only if the ceiling is newly resurfaced and has no blemishes.


Kitchens and Baths

Any room, such as a kitchen or bathroom, that will be exposed to water, splashing, or steam, is best painted with a semi-gloss paint. A guest bath or powder room which will have less-frequent use, could be painted with lower-gloss paint, such as satin or eggshell finish.


Homeowner Done Painting


Many homeowners choose to paint themselves to help save project costs. We have put together some tips to help you understand the responsibilities of acting as the painter on a remodeling project.


The first step is to schedule the painting. Your job as the painter is to work with the Lead Carpenter to schedule the painting. Traditionally painting can occur at two different stages of the project. Painting can happen immediately after sheetrock which eliminates considerable prep, taping, etc. but can lead to nicks, dings, and scratches while the rest of the work goes on. To be safe plan on touching up walls if painting is done early in the project. Painting can also wait until after the rest of the project is complete. This requires more prep and masking but reduces the chance of work related damage.


Part of scheduling the project may be coordinating the delivery of trim and casing in advance of install so you can paint before it is needed by the carpenter.


As the painter it is your job to prepare the space as needed to protect adjacent surfaces and areas. This includes masking windows, taping trim, taping ceilings, using drop cloths, and putting up poly curtain walls if needed or not included in the Castle line-item estimate. Another part of preparing the space is to wipe down the walls and clean the surface to be painted.


After prepping the area to paint there is usually some caulking and spackling of drywall imperfections. Trim and casing also require some touch up to hide nail holes and close gaps at the wall.


Learn more about Fading, Yellowing, Peeling, Cracking, Sagging, Wrinkling Paint Problem – What to do? here>>

Cleaning Vinyl Floor Covering

Regular Cleaning


Use the mildest method you can to make the floor look clean again. Vacuum or sweep regularly to remove dirt before it gets ground in. Wipe up spills at once. When soil won’t come up with vacuum, mop with damp mop squeezed out of cool to lukewarm water. Rub only enough to remove dirt on surface.


Wash only when dirt will not come off by milder methods listed above. Use solution of warm (not hot) water and detergent; apply small amount with mop or sponge, rubbing only enough to loosen dirt; take up with mop or sponge. Rinse off all solution thoroughly with clean, cool water; always rinse well no matter what the detergent or cleaner says about not rinsing. In cleaning, try to remove soil without destroying the wax film on the floor so rewaxing does not have to be done too often.


Removing Old Wax


If too many layers of wax build up, especially in non- traffic areas, floor may discolor or look yellowed. Removing all the wax requires harsher cleaning than ordinary cleaning, and should be done no oftener than once a year, and not that often when not necessary. You can buy commercial wax removers, some made to remove certain types of waxes, or use a homemade solution. If you know the brand of wax on the floor, follow directions on its label for removal.


If you want to make a wax remover:


1. Mix from 1/2 cup to 1 cup of ammonia (start with less and add more if needed) and one cup laundry detergent in 1 gallon warm water.

2. Test in an inconspicuous area to see if it softens the wax film. After several minutes, the area where the solution has been applied with a sponge mop should turn cloudy and soften.

3. Then scrub that area with a stiff brush, electric scrubber or very fine steel wool pads to loosen old wax.

4. Repeat process in another area until entire floor is stripped of wax.

5. Rinse thoroughly with clean, cool water.

6. After drying thoroughly, apply one or two coats of wax depending on conditions of floor, drying between coats according to wax instructions.


Waxing


Wax a thin coat of self-polishing wax on dry, clean floor, when washing does not bring back shine. Wax flooring when new, and always keep it protected with a coat of wax. Regular wax will give more protection and shine than one-step wax-and-clean products, but will build up over time. Polishing wax (solvent based) to be buffed with electric polisher, may also be used on vinyl if desired. It must be thoroughly buffed, following directions on wax label. It will not build up.


Linoleum-Care and Cleaning


Linoleum is an older floor covering that may be found in some older homes. It needs waxing to preserve its surface, usually water-based self-polishing wax, but solvent-based wax to be polished with electric buffer can be used. It dents easily, and is badly damaged by alkalis.


Damp mop using a mild detergent and water for day to day cleaning. Keep water away from seams and edges to prevent loosening of the tiles. To preserve the linoleum floor you may wish to add a capful of baby oil to the mop water. Clean with a mild detergent and water solution and rinse thoroughly. Do not use ammonia or strong alkalis. If water-base wax has to be removed, use Isopropyl Alcohol . To remove old wax by mopping, mix a solution of 3 parts water to 1 parts rubbing alcohol. Scrub this in well and rinse thoroughly. Be sure the area is well-ventilated and wear gloves.


For Rubber Tiles : Mild Detergent. Avoid oils, solvents, and strong alkalis as they will harm the surface. Wash with clear water, a mild detergent, and a clean mop.


Cleaning Vinyl No-Wax Floors


A vinyl or polyurethane finish has been applied on the surface to keep a shine without waxing; the urethane is more durable. To keep it shiny, keep it clean. When washing with a detergent solution, be very sure to rinse it all off. One-step “clean-and-wax” products may leave a film that covers the shine; test if using them. Occasional buffing will heighten the shine.


Eventually all finishes will lose some of their shine as the finish coating wears. Renew it by applying a water-based self-polishing wax. Special vinyl floor finishes sold at flooring stores may also be used, but usually cost more. If a sculptured pattern, apply thinly so no pools of wax collect in low spots. Club Soda. Remove buildup by pouring a small amount of club soda on a section. Scrub this in well. Let it soak in a few minutes and wipe clean. or Vinegar. A few drops in the cleaning water will help remove grease panicles. Dull, greasy film on no-wax linoleum can be washed away with 1/2 cup white vinegar mixed into 1/2 gallon water. Your floor will look sparkling clean.


Applying a self-cleaning floor wax or finish to the “no-wax” vinyl floor can protect from gritty dirt that will eventually scratch the surface. It will also prevent wear in traffic lanes. Removing dirt promptly with the top-rated model of vacuum cleaner and damp-mopping when necessary will also help reduce scratching of the surface.


Source: http://doityourself.com/vinylfloors/resilient.htm


Recycling Resources

Castle is committed to reducing waste and strives to have the least possible negative impact on the environment.  To that end, the companies Castle utilizes to provide dumpsters all dump and sort each load of debris so that only what is necessary ends up in a landfill.  Although this is a start, Castle would like to offer to our clients who wish to see more of their discarded building products recycled these additional resources.  In addition, by donating used materials to non- profit entities, you may be able to claim a tax deduction.  Here are several resources:


Better Homes & Garbage is a privately-owned environmentally focused (not yet for profit) business. They salvage and collect quality reusable building materials and offer them for sale to the public (via www.bhandgarbage.com).  Viewing and Sales are by appointment only.


Salvage opportunities – If you have quality cabinets, doors, hardware, millwork, lumber, windows, etc. that need to find a way back into use, please contact them at 612-644-9412 or joe@BHandGarbage.com. They can dismantle and pick up items from your site or discuss other options on how to keep them in use.


Bro-Tex Carpet Recycling

(http://www.brotex.com/carpetrecycling.aspx)

651-645-5721


Bro-Tex Inc. has pioneered the use of new processes and technologies that allow them to recycle used Post Consumer Carpet (PCC) for a variety of applications. They accept carpet directly at Bro-Tex, or through a network of collection centers. At Bro-Tex they thoroughly inspect and test the carpet by type of material and construction to determine where it can be used. The materials from this carpet could become new carpet, plastic resin for making plastic parts, plastic drainage pipe, new carpet pad, acoustic matting, sorbent material for water pollutants or an energy substitute for natural gas and coal.


  • Must be dry, no wet carpet or pad
  • Rolled residential carpet accepted
  • Commercial carpet accepted only with prior approval
  • Maximum 6 feet for width of carpet in rolls
  • Rolls tied with string or twine (no duct tape)
  • Separated urethane foam padding accepted
  • No rubber-backed carpet or rubber pad
  • No carpet tile or other rigid flooring
  • No carpet scraps or trimmings
  • No tack strips, nails, staples or knife blades
  • No wet glue, debris, refuse, rocks or caked mud
  • Minimal loose dirt
  • Absolutely no co-mingled refuse accepted


Carpet and pad from individuals, carpet installers or registered refuse haulers can be delivered to Bro-Tex or one of their other collection sites as shown at http://www.brotex.com/carpetrecycling.aspx.


Plastic Recovery Technologies

Wyoming, MN 55092

(612) 910-9431 phone


Recycler of vinyl siding